

Siltrapo
I knew it was easy and from a certain point in time I even knew I could do it. Still I felt overwhelmed by the task, by the amount of time it was taking from me and by the feeling I might as well be using it in better ways… I’m always time starved. But then it’d be such a meaningful achievement… it’d be worth every minute if I’d eventually get it working.
I had the motivation. I had a need and I had an idea to fill the gap so, why not give it a try? Brain design work, simple as the design was, was so fun and addictive it added up to the motivation thing but while thinking about things or cutting and taping scaled down paper models, sleeping “bags” and all, was fun and easy, actually measuring and cutting silnylon was not so. It actually turned out to be the hardest task and the only one I had to re-do after screwing things up once.
I couldn’t get over the psychological barrier of starting sewing the damn thing, there was always this one more stuff sack to practice on before going with the tarp. By late winter 05 I thought my idea might as well be outdated or my need covered by any commercially available item I could buy before I had it done so I took a deep breath and went for it, only to realise that’s what was missing, my going for it. Lesson learned and this time I hope to remember it. I can do it. I just have to go for it.
The actual sewing was much easier and fun than the measuring & cutting. It was very rewarding to see things build up little by little. It still took time, plenty of it and I can’t still explain how other sewing newbies get to do it in a weekend or so but I could see I was doing it and it was turning out ok and I could see I was having it finished sooner or later and that helped a lot psychologically.
Now it’s finally done and it’s been used and photographed. And I see those photos and they look like those I had seen from others in a similar situation. I even tend to think like “hey, this looks great! I’d love to build something like that…”, only thing now it’s the one I’ve done and for a moment I just can’t believe it, I can’t believe it’s my thing and it looks great. Small an achievement as it may be, I feel proud.
Background
My first try with tarp shelters had been a Golite Cave. As a life long, unaware of any other option tent user, I knew about this tarp thing and thought it was worth a try (those weight savings were spectacular!). The basic and most direct approach is getting a cheap, flat, featureless tarp and go out and try but I didn’t feel adventorous enough at the time and preferred something that could ease the transition. A shaped tarp like the Cave with an inner tent looked like it could do. It was almost like a tent but with no poles. I also had to sell the idea to my partner which is usually more difficult than selling it to oneself. So it was a Cave 2 with Nest.
There were things that convinced us, others that didn’t. I’ve ended up using the Cave 2 for solo travel, I like it for that and I happily carry the extra weight in trade for the extra space and hence the extra protection. But we thought it was too small for two in bad weather. Surely doable but not too comfortable. Furthermore, she is very sensitive to air currents of which the Cave has plenty. Apart from all that, we both liked it so I started thinking of building one that would try to solve those little problems. I tried to find my motivation in building something I could not find commercially, custom made to our requirements. It made sense.
Requirements
I liked the Cave and I wanted to keep the parts that I liked. My goal was to change just what I didn’t like. Hence,
- It’d be bigger. Somehow, bigger. We’ll see how.
- It’d be possible to set it up flush to the ground all around without turning it into a sarcophagus.
- It’d be possible to set it up higher than the Cave when using trekking poles.
That’s what would change. This is what it’d keep:
- It’d keep the pitching flexibility: it could be set up higher or lower depending on conditions, with a variable gap around the perimeter edge. In short, variable geometry.
- It’d be set up with trekking poles, fallen branches, tree trunks, high-tension towers, you name it… anything solid enough standing high enough.
- It’d be lightweight in construction and materials.
- It’d have beaks. We like beaks.
- It’d be symmetric in any direction, no tapering.
- It’d all be straight lines, no catenary curves.
These last two were meant to keep it simple.
With all those premises, I came up with the following preliminary specs:
Preliminary specs
- Wider than the Cave, while keeping the same length but with bigger beaks.
Reasoning: This is what the “bigger” requirement translated to and it is also a consequence of the “flush to the ground” and “higher” reqs. The length of the Cave seemed good to us, no reason to make it longer. By making it wider, we could have extra protection or, in other words, extra protected space in bad weather and we could also pitch the sides flush to the ground while still keeping a decent living space, length and width wise, so we could still be comfortable in bad weather conditions. I do think a shelter is as good as its bad weather performance. Well, not so much but almost.
The bigger beaks would give us extra protected space as well as the possibility to flush them to the ground too while still keeping decent head room.
- Poles could go inside, under the ridge.
Reasoning: We were not happy with the maximum ridge height possible on the Cave when using hiking poles for pitching (our usual strategy). The fact that the poles go outside and must be displaced from the ridge end by a distance enough to deploy the beak made it too low even at pole max. length. The ridge was hanging from the pole and the horizontal gap between pole and ridge end meant also a vertical gap that made the tarp too low. We’d keep this possibility (ridge hanging from outside poles) to allow for other types of supports (trees, etc.) and because the tension on the ridge is then linear, no side pull on the stitches, which is a good thing, but we’d allow for placing the poles inside, under the ridge end.
- Beaks’ design would change.
Reasoning: We wanted them bigger but we also wanted to keep the tarp’s geometry as variable as in the Cave. Making the beaks bigger while keeping a 90º angle where the smaller (Cave’s) beaks had it meant the tarp couldn’t be expanded and lowered as much, so it was necessary to change the angles of the triangles forming the beaks. For each beak triangle (each half beak), the angle at the tarp’s body corner would be bigger than on the Cave and the angle at the beak’s outer edge (the former 90º angle) would be smaller. As a result, when flush to the ground, the beaks would not be in a vertical position as in the Cave but would still be protruding forwards from the main tarp panels, creating a sort of vestibule as a side effect.
This would still mean the tarp couldn’t be lowered as much the Cave (as the edges at the beaks would hit the ground “sooner”); solution: the seam joining the two beak’s halves would be sewn only to the point where it would have ended in the Cave and the remaining seam length would not be sewn but closed with velcro. That way, the fully sewn section of the beaks would have the same design as those of the Cave (scaled up to match the now wider tarp panels) and the “added” section could be open. It’d be left flat on the ground if lowering the tarp to minimum height (only for extreme conditions).
Fabrics
- 1.3 oz/sq.yd. (45.5 gr./sq.m.) silnylon seconds from Noah Lamport (I can’t find this locally). Dark green.
- Gutterman 100% polyester thread, Mara 70 size (whatever that means).
- Polyester gross grain ribbon. No specs. available, I got it locally. It’s similar to what I’ve seen in use in commercial models.
- 1/2″ hook & loop. Oddly enough, I can’t find this locally. 2 cm. is the narrowest I could find. I grabbed plenty of 1/2″ in my last visit to Seattle.
- 2 mm. reflective nylon cord for main lines (ridge and corners), 1 mm. dyneema cord for side tie-outs and beak peak line.
- Silicone sealant plus some mineral spirits for the seam sealing.
Final Specs
- Weight: 715 gr. or 25.2 oz
- Length of main tarp body (flat): 2.7 m. or 9 ft.
- Width of main tarp body (flat): 3 m.16 cm. or 10 ft.6.3″
- Beak maximum length (flat at center beak seam): 110 cm. or 43″
Weight does not include stuff sack or stakes. I’ll be taking 10 stakes of various shapes and sizes weighting 150 gr. or 5.3 oz in their stuff sack.
I plan to include some diagrams but I have to find the time. I’m very bad at diagrams or anything graphic.
So far, it’s gone through one trip where I put it to a mild test: thick forest canopy, no wind and some light rain. It performed flawlessly. I’m aware in those conditions a set of trash bags would have performed just as well but to me it still means such a big achievement to have slept under a thing I made. It feels great. Here’s a few pics…

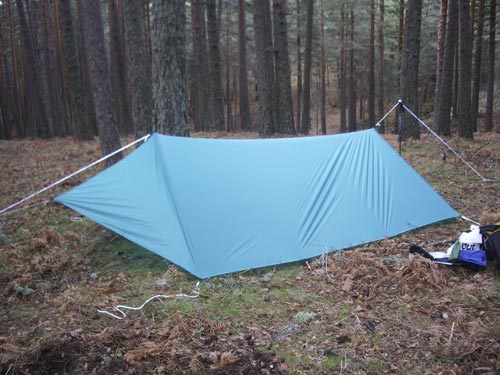
Almost flush to the ground on three sides. It had been very windy during the day but it calmed down and stayed that way for the night. This end is meant to be the rear (there’s no front, no rear by design) and will stay closed. The pole on this side has been set outside (I wanted to try both options) and it can be seen protruding through the beak’s velcro closure.
I swear it’s dark green. I don’t know what these digital cameras do to colours these days.
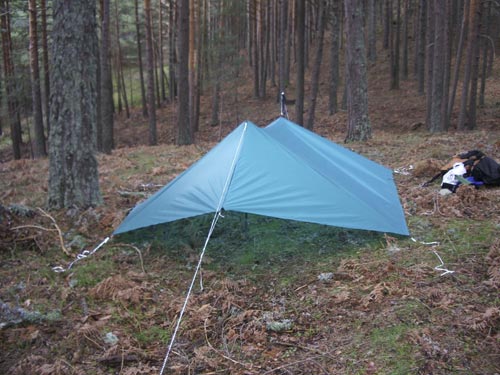
Side/front view. The pole at the front is set inside. The velcro closure can be open to almost 2/3 of the beak seam length so entry and exit is easy.
Front view. The beak apex is tied to the ridge guy with a taut line hitch.How could I live without the taut line hitch before, I do not know.
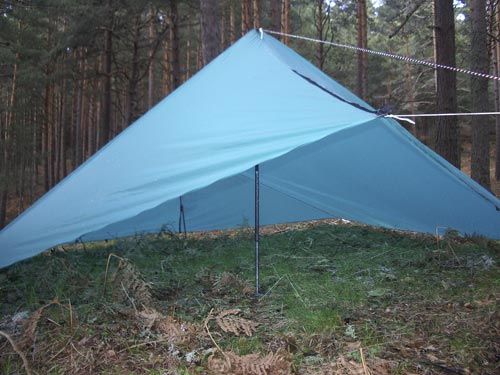
Front view with the pole in place. The length of the velcro closure can be seen. It’s huge inside (it’s meant for two but can easily accommodate four. I might have made it too big, actually.

Velcro open. No need to crawl

The Siltrapo has been populated. A plastic sheet and the quilt, placed to the left of the covered area (it was the flatest)
I spent a very comfortable night. It was freezing cold but calm and dry. It started raining at dawn and the tarp shed it with ease, no leaks (I had applied 15 gr., almost 1/2 oz!!! in sealant alone so I expected no leaks!). I had no condensation at all. Above all, I felt safe and comfortable, if only a bit on the cold side but that’s not the tarp’s fault.
Summary
I really like this design safe for one thing: the tarp panels are huge and I’m afraid they’ll be very sensitive to wind. Setting it low is an option but then it’ll need a huge amount of real state, which may be or may not be a problem. I’m thinking on ways to solve this but I’m afraid there’s no perfect solution. In calm conditions, it is a palace for two. We could play cards or football inside. It may be set up so high without cutting too much on width and it can be closed completely while still allowing reasonable room. I’ll probably add a bath tub floor
Acknowledgments and references
Ray Jardine. I must say there’s things I don’t like about the guy but he definitely was a source of inspiration and encouragement. I got his tarp book and used it thoroughly through the process. It is a good book and it proved useful.
The Lightweight Backpacker. My favourite DIY source. It’s the technical details but it’s also the (again) inspiration I got there from people like me or people who knew so much more than me or people who knew little but were enthusiastic about their goals and went for it. I wouldn’t have done it without you all.
 RSS – Posts
Say what you want